|
|
Our second report will be much more complicated than the first one (it will contain a DB table of company clients). To produce this report let’s use the demonstration database DBDEMOS that is included in the Delphi distribution kit. Create a new project in Delphi, place a “TTable” component on the form and set some of its properties:
DatabaseName = 'DBDEMOS'
TableName = 'Customer.db'
To make the table’s data available for use in FastReport add a “TfrxDBDataSet” component to the form and then set one property:
DataSet = Table1
Finally, add a “TfrxReport” (the basic component of FastReport) to the form, double-click it to open the FastReport designer and click the “New report” button there to automatically create a basic report design with three bands (“Report title,” “Master data” and “Page footer”). To make our table useable we must enable it in FastReport. Do this by clicking the “Report>Data...” menu item, checking frxDBDataset1 (it is the only dataset listed at the moment) and clicking OK. After the dialogue has closed, the DBDataset and the table fields to which it is connected become visible in the “Data tree” pane in the IDE.
Now let’s design the report. First, add a “Text” object containing “List of clients” to the “ReportTitle” band.
Next, connect the “MasterData” band to our dataset. This can done in any of three ways:
- double-click on the band
- select “Edit...” in the band’s contextual menu
- or click on the “DataSet” property of the band in the object inspector
Now place four “Text” objects (which will display the client number, customer name, phone and fax fields from the dataset) on the band. Let’s do this in several different ways to demonstrate some features of the FastReport designer.
The first way is to place a “Text” object on the band and type "[frxDBDataSet1."CustNo"]" into it. This is the least convenient way, since the field link has to be entered manually, with the possibility of incorrectly typing the text. Somewhat easier is to use the expression designer - double-click the “Text” object and click the leftmost button on the “Text” tab of the editor window which opens. To insert our field double-click the field name in the expression designer. Click the OK button to close the dialogue and see the field link inserted into the “Text” object.
The second way of adding the DB field to the “Text” object is by setting two properties in the object inspector. Place a second “Text” object on the band, without writing anything in the editor window. Set the object’s properties using the object inspector:
DataSet = frxDBDataSet1
DataField = 'Company'
Both of these properties are presented as a list, so just select the required value from the drop-down using the mouse.
The third way is to “drag and drop” the required field from the “Data tree” pane into the report. This is the simplest and easiest way, but before doing it uncheck the “Create header” checkbox at the bottom of the “Data tree” pane, otherwise a second “Text” object, containing the field’s name, is created in addition to the field link object itself. In this way select the “Phone” field and drag it onto the band.
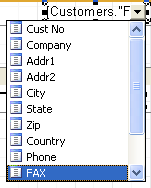
The fourth way requires the designer option “Show drop-down fields list” flag to be set (via main menu : “View>Options”) and the band to be already connected to the dataset. Place a blank “Text” object on the band and hover the cursor over the object – a drop-down button will appear at the right hand end. Click this button to open the list of DB fields and select the ”FAX” field.

Our report design is complete.

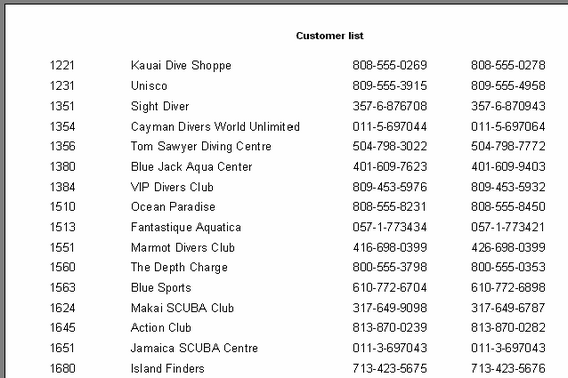
Click on the “Preview” button to see the result.
 |

